Production Output Registration
- Open output dialog
- Open Production Order Line
- Record output data
- Post output
1. Open output dialog
Output for Production Orders is recorded and posted via the Production Output dialog. It can be accessed through the main menu as an independent action. The Consumption Registration is recorded via a separate dialog.
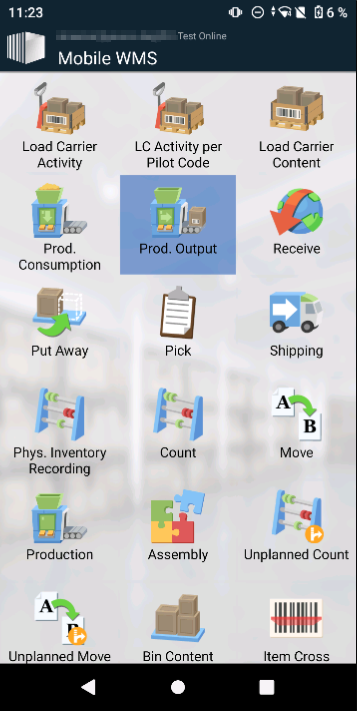
2. Open Production Order Line
When selecting the Prod. Output Menu, the first view that opens up is a filter for the Production Order Lines.
Filtering Prod. Order Lines
The user can filter the list of Production Order Lines to the following values
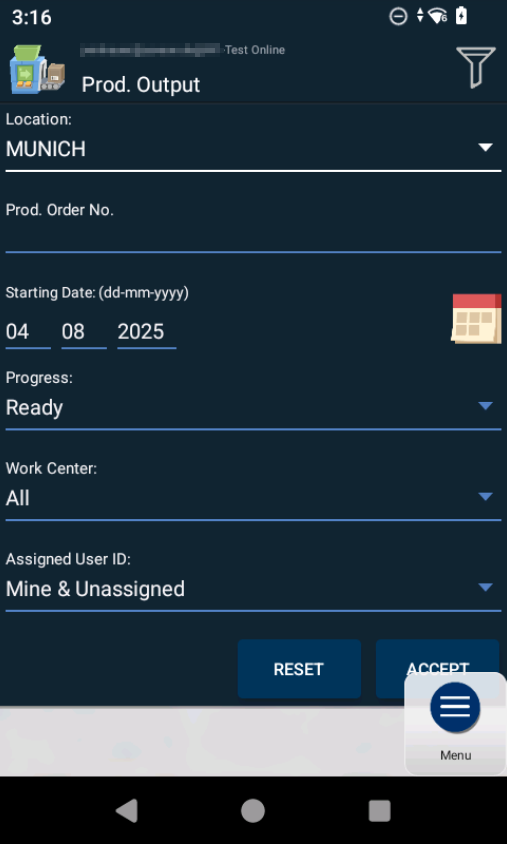
Location
All Prod. Order Lines corresponding to the Location in the filter can be seen
Prod. Order No.
Only Production Order Lines corresponding to the entered Prod. Order No. can be seen.
Starting Date
All Prod. Order Lines with a Starting Date smaller or equal to the Starting Date in the filter can be seen
Progress
There are the options Ready, Completed and All. Ready only shows the Prod. Order Lines that do not have any finished quantity yet, while Completed only shows the lines where the finished quantity is larger or equal to the expected quantity.
Work Center
All Prod. Order Lines that include the Work Center in the filter at least once in their Routing can be seen
Assigned User-ID
There are the options, Mine & Unassigned, All and Only my orders. The view is adjusted accordingly.
After accepting, the filtered list of Production Order Lines is shown. The filter can be accessed again any time via the filter symbol in the top right.
Note
The following criteria are the prerequisites for the availability in Yaveon 365 Manufacturing Scanning:
- Prod. Order needs to have the Status Released
- Prod. Order needs to have a Location Code
- The lines are visible until the Status of the Prod. Order is set to Finished
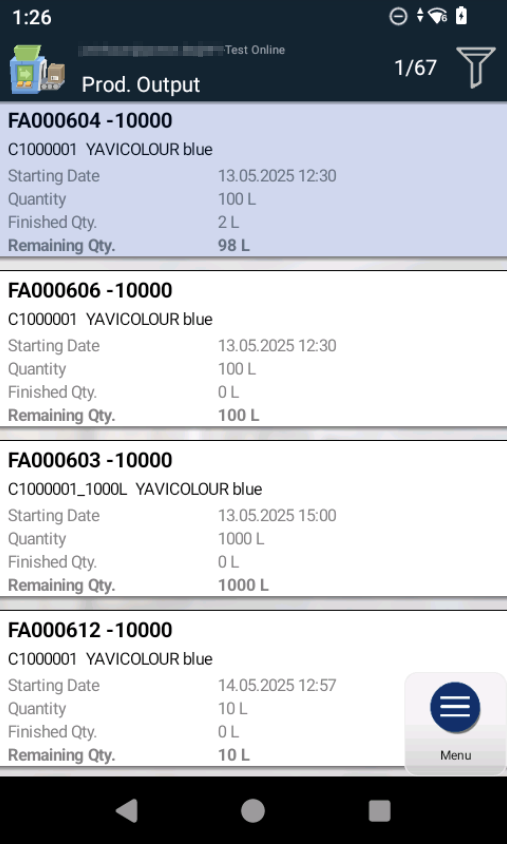
The first line of each record includes, if available, the Prod. Order No., Prod. Order Line No. and the Batch No..
The second line includes the Item No. and Item Description
Afterwards, the Starting DateTime of each line is listed, together with the total expected quantity, the already finished quantity, and the remaining quantity.
Selection of a Prod. Order Line
The line can be selected in a number of different ways.
- Manual Selection through the display
- Scanning a Product Label
- Scanning a Prod. Order No.
- Scanning a Prod. Order No. + Line No.
- Scanning a Prod. Order No. + Line No. + Operation No.
Scanning a given label either causes the view to be filtered or a particular line to be selected, depending on whether the scanned label corresponds to one or multiple Prod. Order Lines.
Scanning any of the above variations of the Production Order only works while in the filter view, while a Product Label can be successfully scanned in the view of the Prod. Order Lines.
3. Record output data
Recording the output data happens in seven or fewer queries.
- Lot No.
- Production Date
- Expiration Date
- Quantity
- Package Type
- Load Carrier No.
- Printer
- Post (Green Checkmark)
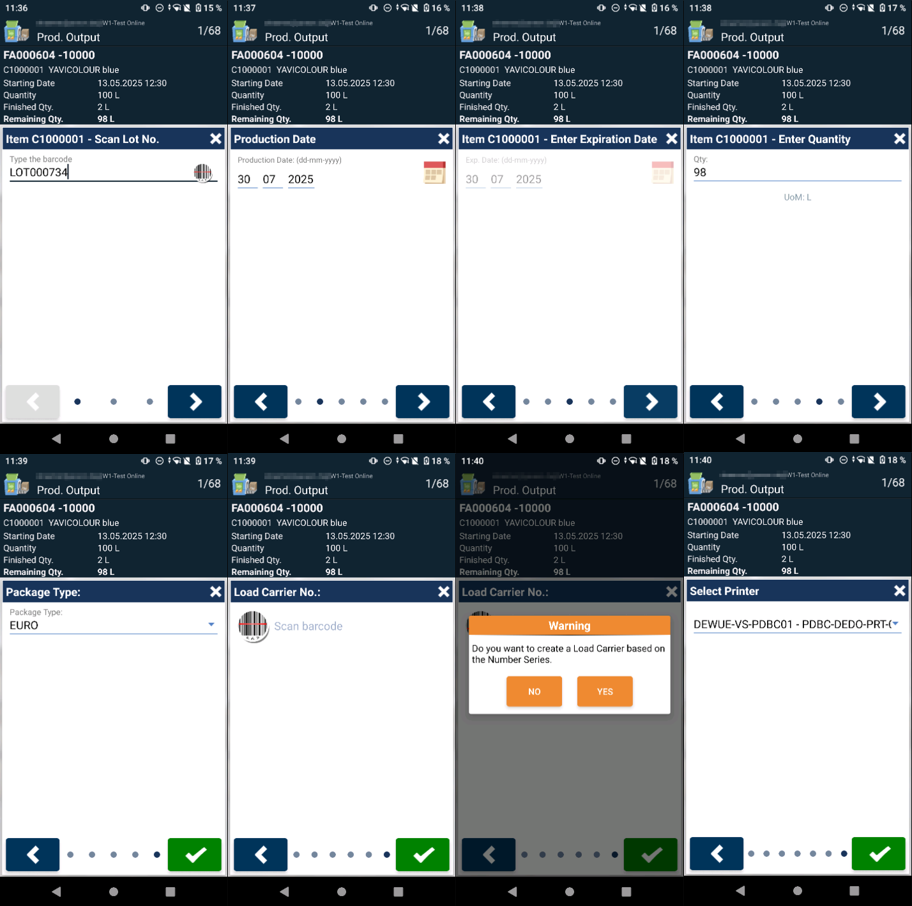
The query for the Expiration Date only appears, if there is no Expiration Date filled in the corresponding Item Tracking Line and no Expiration Date Calculation is set up on the corresponding item card.
The query for the Load Carrier No. only appears, if a Package Type was entered. If this happens, and the user then attempts to skip the Load Carrier No., a new Load Carrier No. will be created from the corresponding No. Series. In this case, the Printer Selection will appear as the next step, where a Load Carrier Label will be printed automatically from the selected printer.
Alternatively, the user can manually enter a Load Carrier No. If the Manual Nos. option is enabled on the No. Series of the entered Package Type, a manually entered Load Carrier No. that does not yet exist in the system is accepted; the corresponding Load Carrier is then created when the output is posted. If the option is not enabled, entering a Load Carrier No. that does not exist results in an error message.
Note
If a GS1 Label is scanned for the selection of a Prod. Order Line or in one of the queries, then the relevant contained information will be prefilled for confirmation in the corresponding queries.
Note
When the The Feature changed the barcodes from the legacy format to a GS1 Barcode. feature is active, load carrier labels are printed in GS1 format. You can configure the physical appearance of GS1 barcodes (resolution, module width, height, width) in Barcode Parameters.
4. Post output
Contrary to the Consumption Registration, if a query is finished by accepting the last step, the corresponding data is immediately posted and transferred to BC.