Inspection Order
Inspection orders are documents in which a concrete inspection is carried out on a concrete test object (e.g. item, batch). A basic distinction can be made between one-time and recurring inspections. For one-time inspection orders, you can create an inspection order manually without defining an inspection plan. For recurring, process-related inspections, the inspection data is defined in an Inspection Plan and you can then create the inspection order manually or automatically on the basis of the inspection plan in the process.
When selecting the inspection plan, the system searches hierarchically for the most accurate inspection plan: The system first checks whether there is an inspection plan for which the business relationship type, number, and/or group match. If no suitable inspection plan is found, the system then checks whether an inspection plan exists for the item or item group. If no suitable inspection plan is found, the system checks whether an inspection plan exists without any further restrictions.
If several valid inspection plans with the same priority are found, an inspection order with the inspection plan with the highest number is created.
Process-oriented Manual Inspection Order creation
Inspection orders can be created process-related. In the following documents, you can use the function call Create Inspection Orders to create an inspection order from the process:
- Purchase Order
- Purchase Receipt
- Purchase Return Order
- Sales Order
- Sales Shipment
- Production Order
- Prod. Order Routing Line
- PB365 Lot No. Information (Inventory Inspection)
- Lot No Information (Inventory Inspection)
- Inventory Summary (Inventory Inspection)
- Serial No. Information (Inventory Inspection)
- Transfer Order
- Posted Lot Merge
Requirement for the creation is that a certified inspection plan exists for the inspection object and an inspection group of the corresponding Inspection Source is included in this. If several inspection plan versions are found, the inspection plan with the highest version is used. The reference to the origin document is displayed in the fields Inspection Source Type and Inspection Source Record ID. The existing fields in the inspection order header and line are filled automatically by the system based on the inspection plan. Depending on the activation of the field Release Inspection Order in the ProBatch 365 Quality assurance setup, you can create the inspection order with either the status Created or Released. You can also define in the quality assurance setup whether the status Inspection and/or Inspection completed should be set automatically when the first actual value is entered or when the last actual value is entered. To do this, you must activate the fields Set Status = Inspection with value recording and/or Set Status = Inspection Finished with completing value recording. If you do not want the system to do this, you must change the status manually in the inspection order.
Note
If the inspection order is created with the initial status Released, you can start entering the actual values directly. If changes and additions before processing inspection orders are frequently you should not activate this field in the quality assurance setup, since changes are only allowed in the Created status.
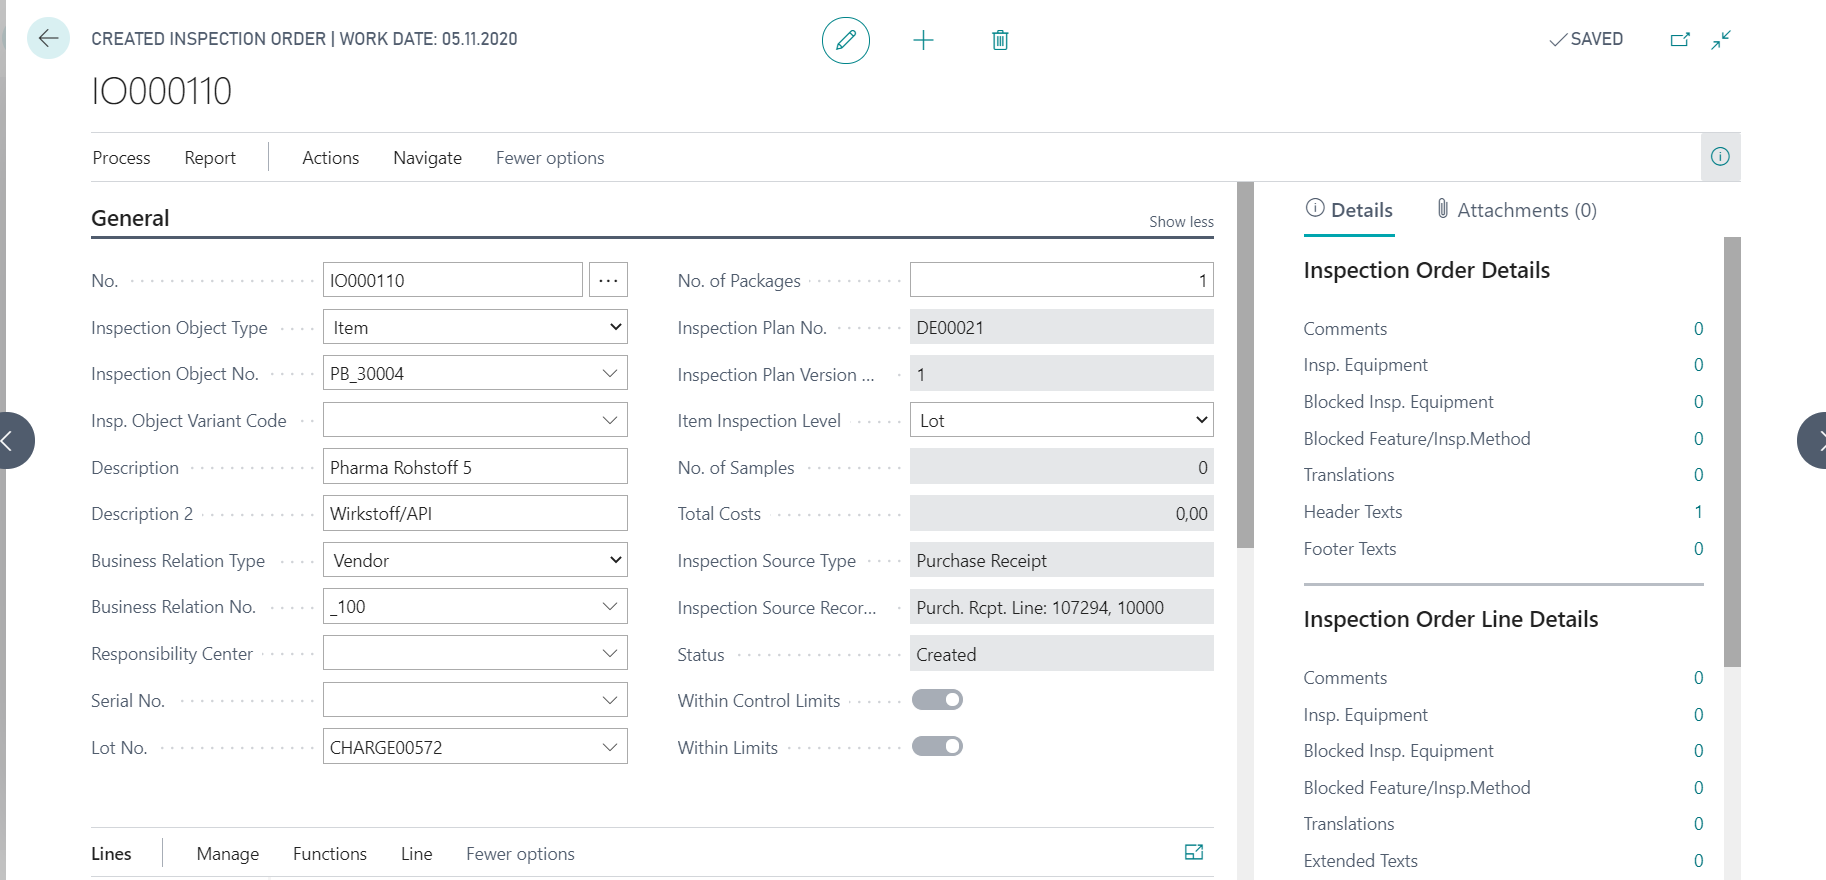
Overview of the different statuses of an Inspection Order
In addition to the previous paragraph, you will find a short list of the different inspection order statuses here:
| Status | Description |
|---|---|
| Created | The inspection order is not yet in process or released for inspection. |
| Released | The inspection order is released for processing, but no actual values were entered yet. |
| Inspection | The actual values are not completely entered, so the inspection is not yet complete. |
| Inspection completed | All actual values are entered. |
| Finished | The Finish action has been executed, the inspection order can no longer be edited. |
| Cancelled | The inspection order was not completed but cancelled. |
Automatic creation of an Inspection Order
It is also possible to define a setup for the automatic creation of inspection orders for selected processes. For more information, read the chapter Automatic Inspection Order Creation.
Manual creation of an Inspection Order
To create an inspection order manually, you can use the action New on the Page Created Inspection Order. An empty inspection order card is created and you can create a new inspection order number using the No. field. You can enter the inspection object in the fields Inspection Object Type and Inspection Object No.. If you have selected an item as an inspection object type, you must define the field Item Inspection Level and, depending on the selection, you may also fill the field Lot no. or Serial No.. You can then select an inspection group in the inspection order lines and add further data. When you release the inspection order, you can begin inspection recording as described above.
In addition to the manual entry of inspection groups and inspection features, you can copy data from any inspection plan using the action Copy.... To do this, you must select an Inspection Plan No. and a Version Code. You can also select an Inspection Group of the inspection plan if not all inspection groups of the inspection plan are to be transferred. With Ok, the data from the inspection plan is transferred to the manually created inspection order.
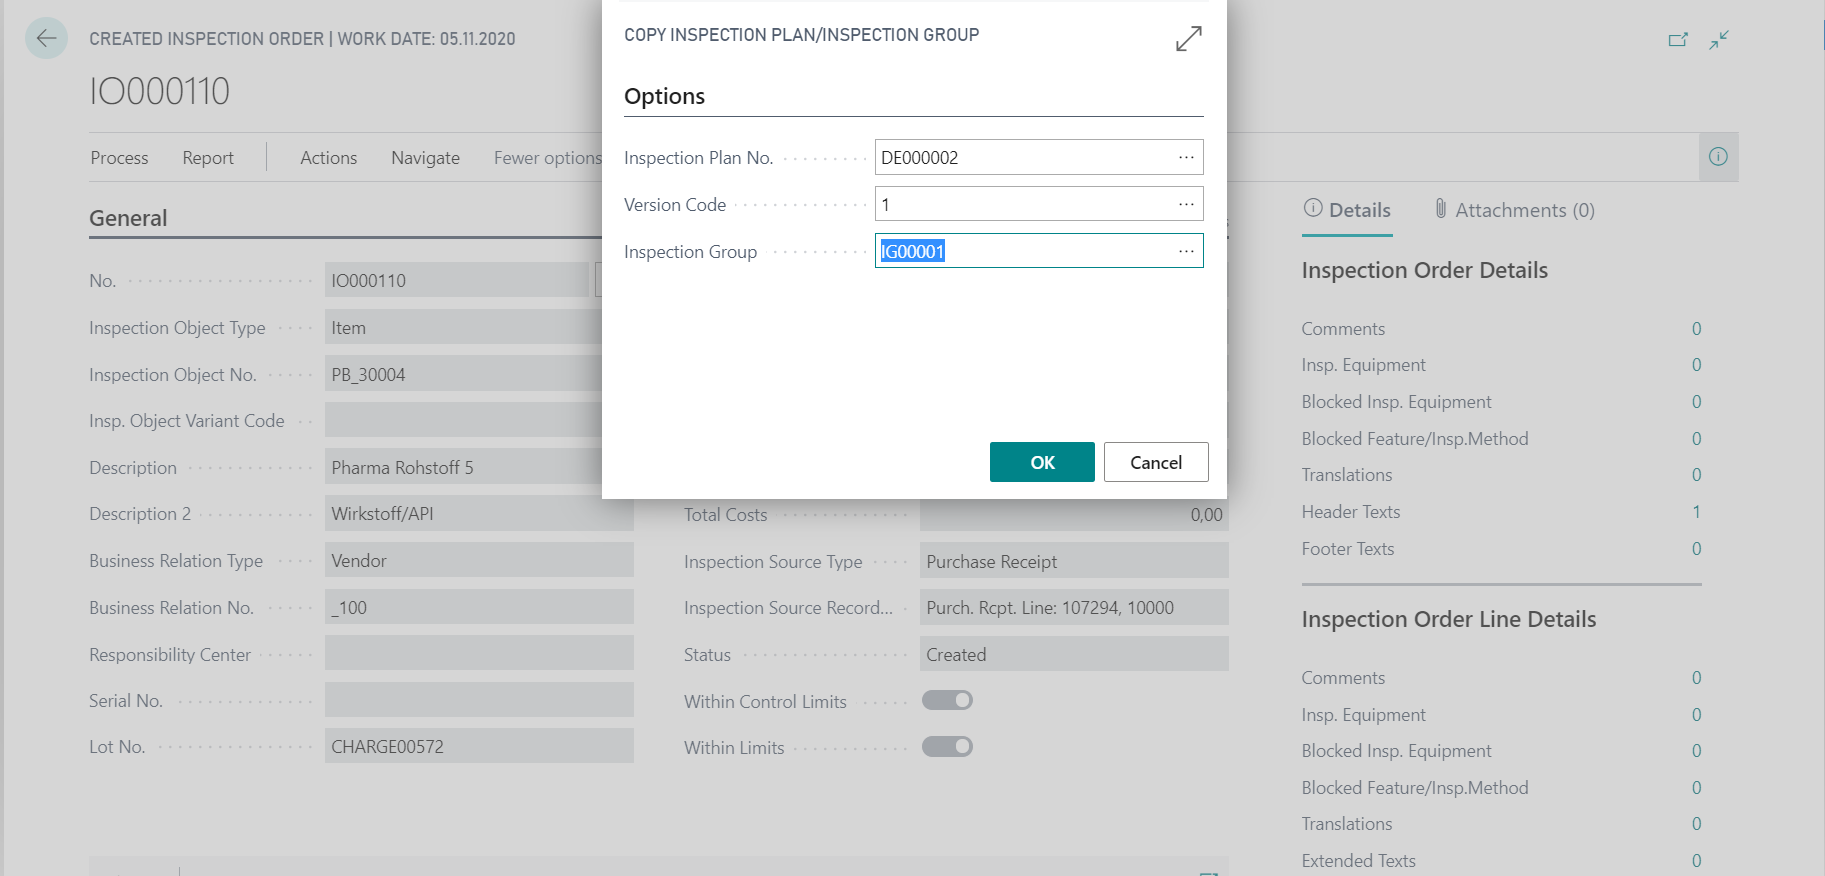
Entering the actual values in the Inspection Order
Two different options are available for recording actual values:
You can enter the actual values directly in the inspection order lines in the field Actual Values or you can use the action Actual Value Recording in the inspection order header. If a Data Entry Page ID is assigned in the ProBatch 365 Quality Assurance Setup or in the Inspection Groups, one of the two available actual value recording screens opens for an actual value entry (here, actual value recording 2).
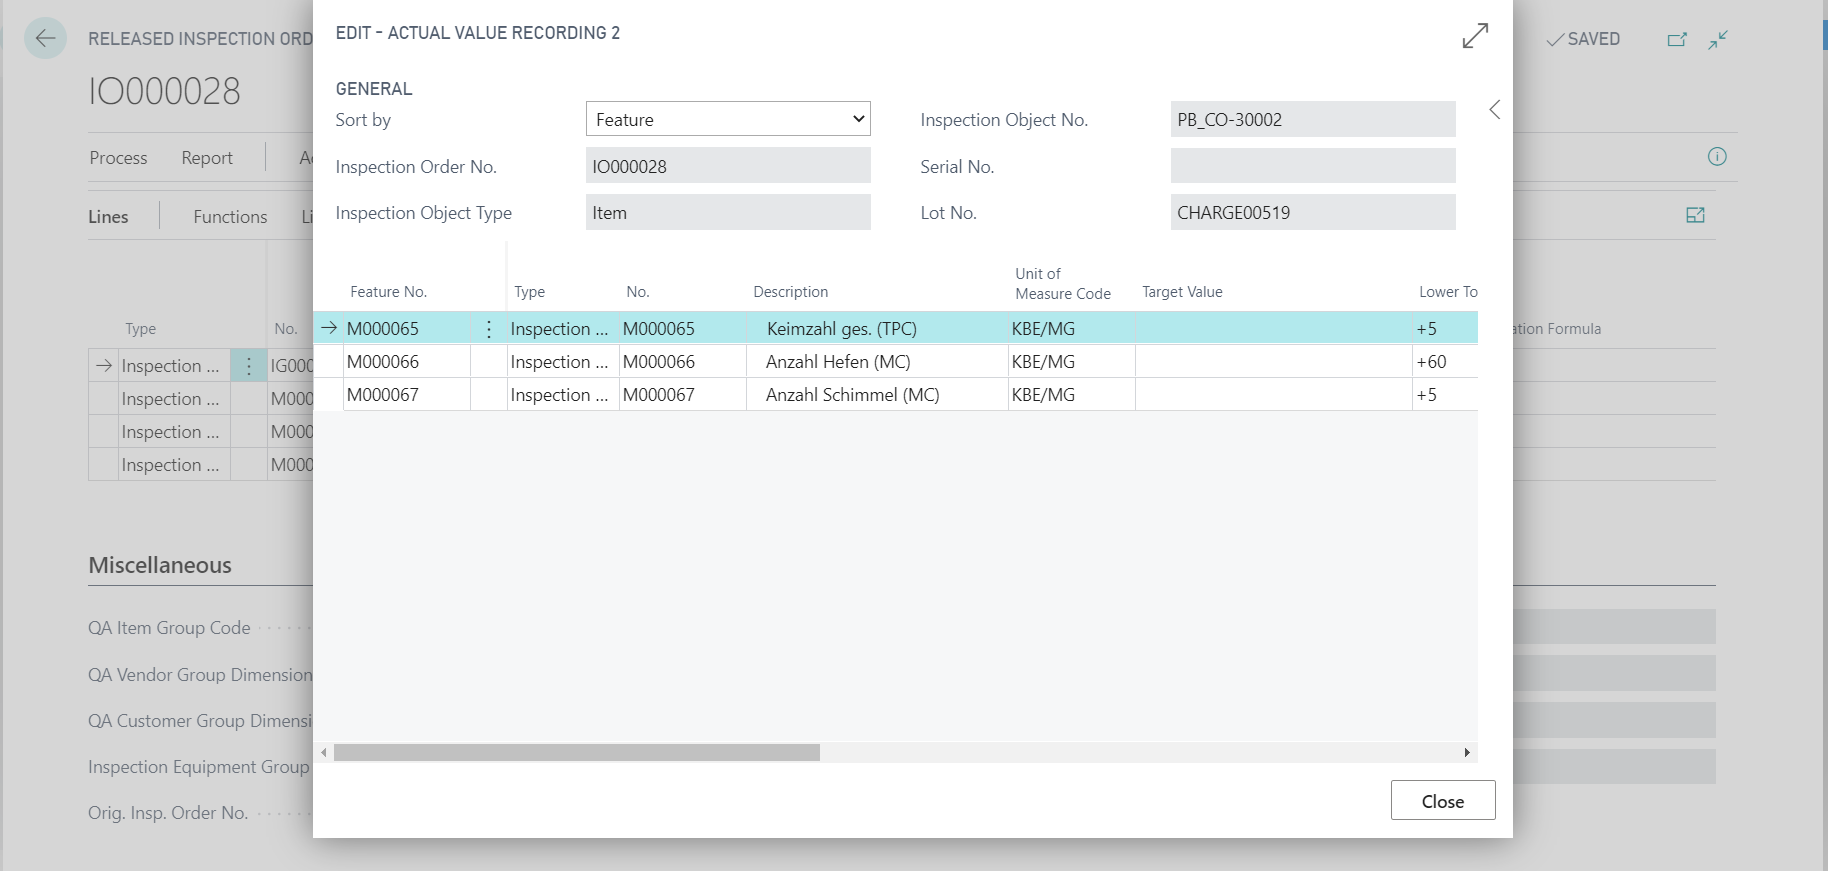
If the inspection order contains more than one inspection group, a query opens and you must select the inspection group for which you want to perform an actual value recording.
When the actual values are entered, the following actions are still carried out:
- When inspecting samples, the result is transferred to the inspection feature according to the sample results calculation.
- When the first actual value is entered for a inspection group, the status of the inspection group is changed. The status of the inspection group is also changed when you enter the last actual value.
- The actual value is used to check whether the control limit and tolerance limits have been maintained. The system sets or updates the corresponding fields in the inspection order header/line.
Retesting of samples
If you want to check the result of an inspection again, you have two different options. You can either record another result for the same sample or draw a new sample. In general, this is only possible if you are on a line with the type Sample. You can use the action Retest Sample to record another result for a sample. The system inserts an additional line in the inspection order as a copy of the selected sample line and you can record another actual value. Both actual values of the sample are included in the calculation of the final result. To repeat the inspection with a new sample, you can use the action Create additional Sample in the created or released inspection order. A new data record is inserted as a copy of the selected row in the table Inspection order samples and is added as a new sample to the currently selected inspection feature row.
Note
It is not possible to repeat inspections for sample lines with a check mark in the Destructive Inspection field. If you still want to inspect the sample again, you must use the action Create additional Sample.
Finishing the inspection and changing the status of the batch
After the inspection is complete, you can set the inspection job to completed with the action Finish. You can no longer edit a completed inspection order. You can find it in the history under Finished Inspection Orders.
In the completed inspection order, you have the option of making a Usage Decision. The system creates a new Lot No. Info Modification and you can then define the status of the lot, for example, using the field New Status and then confirm it using the action Post.... In addition to the manual usage decision, you can also define rules in the system for carrying out automatic article tracking status Change. These rules are described in more detail in Automatic Item Tracking Status Modification.
Canceling tests
You can cancel a test at any time. For example, if you do not want to continue the inspection due to a negative feature. In the released inspection order, you can execute the action Cancel and the inspection order status is then set to Cancelled. You can call up canceled inspection orders again under Finished Inspection Orders.
Retesting
Starting from a completed or canceled inspection order, you can execute the action Create Re-Inspection Order. In this case, the entire inspection is carried out again. You have to re-enter all inspection features. Depending on the activation of the field Release Inspection Order in the ProBatch 365 Quality assurance setup, you can create the inspection order with either the status Created or Released. You can recognize that this is a re-inspection by the field Orig. Insp. Order No. in the newly created inspection order.
The following fields will be reset in the newly created inspection order:
- Status
- Within control/tolerance limits
- Created by, Creation Date, Last Modified by, Last Date Modified
- Actual value
Additional functions in the Inspection Order
In addition to the available actions and functions already mentioned, the following functions are available:
- You can call up the origin document using the action Show Source Document.
- You can define PB365 Header Texts, PB365 Footer Texts and PB365 Line Texts. For more information, see the chapter Overview - Text Module.
- The action Samples opens a new window in which all samples in this inspection order are displayed. Here you also have the possibility to edit the list.
- You can also define Comments and Translations for the inspection order header and in the inspection order lines.
- In the inspection order lines, you can use the action Inspection Equipment to add or view inspection equipment. To add inspection equipment, the inspection order status must be Created.
- Depending on the setting in the quality assurance setup in the Status Cert. of Analysis Creation field, you can create a certificate of analysis from the status stored there. The action Create Certificate of Analysis is available for this purpose.
- You can use the action Create Sample Shipping to create the shipping of samples that must be tested by external laboratories and are marked accordingly. Under Sample shipping, you can find shipments that have already been generated. For more information, see the chapter Sample Shipment.
- Starting from the inspection order, you can create a printout/document for the Inspection Order, existing Inspection Samples, and Retained Sample Label. Retained sample labels are basically just different labels for existing inspection samples to identify them as retained samples. The sample numbers are assigned when the inspection order is created; a retained sample does not have its own number.