Yaveon 365 Process Base Corporate Design Documents Setup
Settings that apply to all documents can be made on this page. Here you can set a single Corporate Design for all documents.
This general setup, which applies to all documents, can be overridden by the Report-Specific Setup. This in turn can be overridden by the Custom Specific Setup.
The setup options are explained below.
General tab
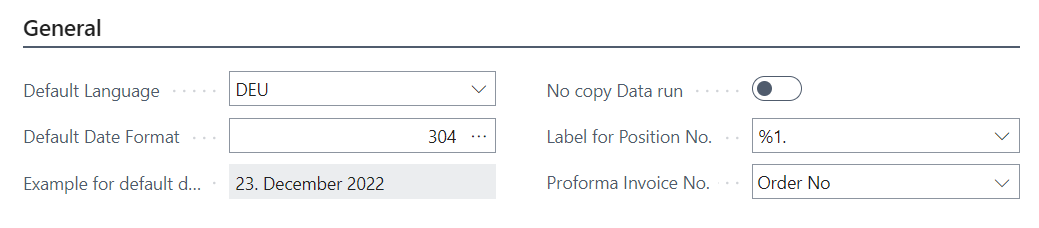
Default Language
A Language Code can be stored in the Default Language field. If the language code in a document is empty, this language code is used to define the language of the document. This language code is also used for background executions.
Default Format Region
A Region Code can be set up in the Default Format Region field. This defines the regional format used for numbers, dates, and other locale-sensitive values in the printed document. When printing a Corporate Design document, the Format Region field from the document itself (e.g., Sales Invoice, Purchase Order) is used. If no Format Region is set on the document, the Default Format Region from this setup is used as a fallback. This setting is independent of the document's language.
Default Date Format
In the Default Date Format field, the appearance of the date fields in the document can be defined, if not defined otherwise. The format 304 = [C]DD.Month.YYYY is initialized, e.g. 4. May 2020.
The following date formats can be selected:
| No. | Description | Example |
|---|---|---|
| 0 | Default: No Special Format | |
| 300 | [C]DD-MM-YY | U04.05.20 |
| 301 | [C]DD-MM-YY | U04.05.20 |
| 302 | DD-MM-YY[C]D | 040520CD |
| 303 | [C]YY-MM-DD | C20.05.04 |
| 304 | [C]DD.Month.YYYY | C4. May 2020 |
| 305 | [C]DDMMYY | C040520 |
| 306 | [C]YYMMDD | C200504 |
| 307 | DD. Mmm YYYY | 4. May 2020 |
| 308 | Basic format | C04.05.20 |
| 309 | DD.MM.YYYY | 04.05.2020 |
C is the closing date, the last date after the end of the period. This is used to identify balancing items.
The separator between the date elements depends on the region that is set, e.g. dot or hyphen.
Example for default date format
Displays the current date in the date format selected in the Default Date Format field.
No copy data run
The data for the document is not calculated a second time for the copy of the document.
Line No. Divisor for POS
Note
This field and setup only exists up to Yaveon 365 Process Base Version 4.0
A position number can be specified at the line level of documents. For example, article item 1, article item 2... This position number is calculated based on the line number. The line number is divided by the value in the field Line No. Divisor for POS. The line number in BC is generated in steps of 10,000 by default.
The setup is described in page Position numbers in document lines.
Label for Position no.
Note
This field and setup only exists from Yaveon 365 Process Base Version 4.0 onwards
In the line section, for example, the individual item lines can be provided with a position number. This setup is possible with a fill function in the CD Field Configuration. This position number can be formatted in the field Label for Position No. . The default setup is %1. That means that a dot is printed after the position numbers, e.g. 1., 2. ....
The setup is described in page Position numbers in document lines.
Proforma Invoice No.
The Proforma Invoice No. field can be used to specify which number should be printed on the Proforma Invoice document. Either the Order No of the sales order from which the Proforma invoice is printed, or the Invoice No.. In case of the invoice number, the system will take the next available number from the number series for the posted sales invoice, print it and reserve it for the first posted invoice from this order.
Proforma Shipment No.
The Proforma Shipment No. field can be used to specify which number should be printed on the Proforma Shipment document. Either the Order No. of the sales order from which the Proforma shipment is printed, or the Shipment No..
Report Print Details tab
Note
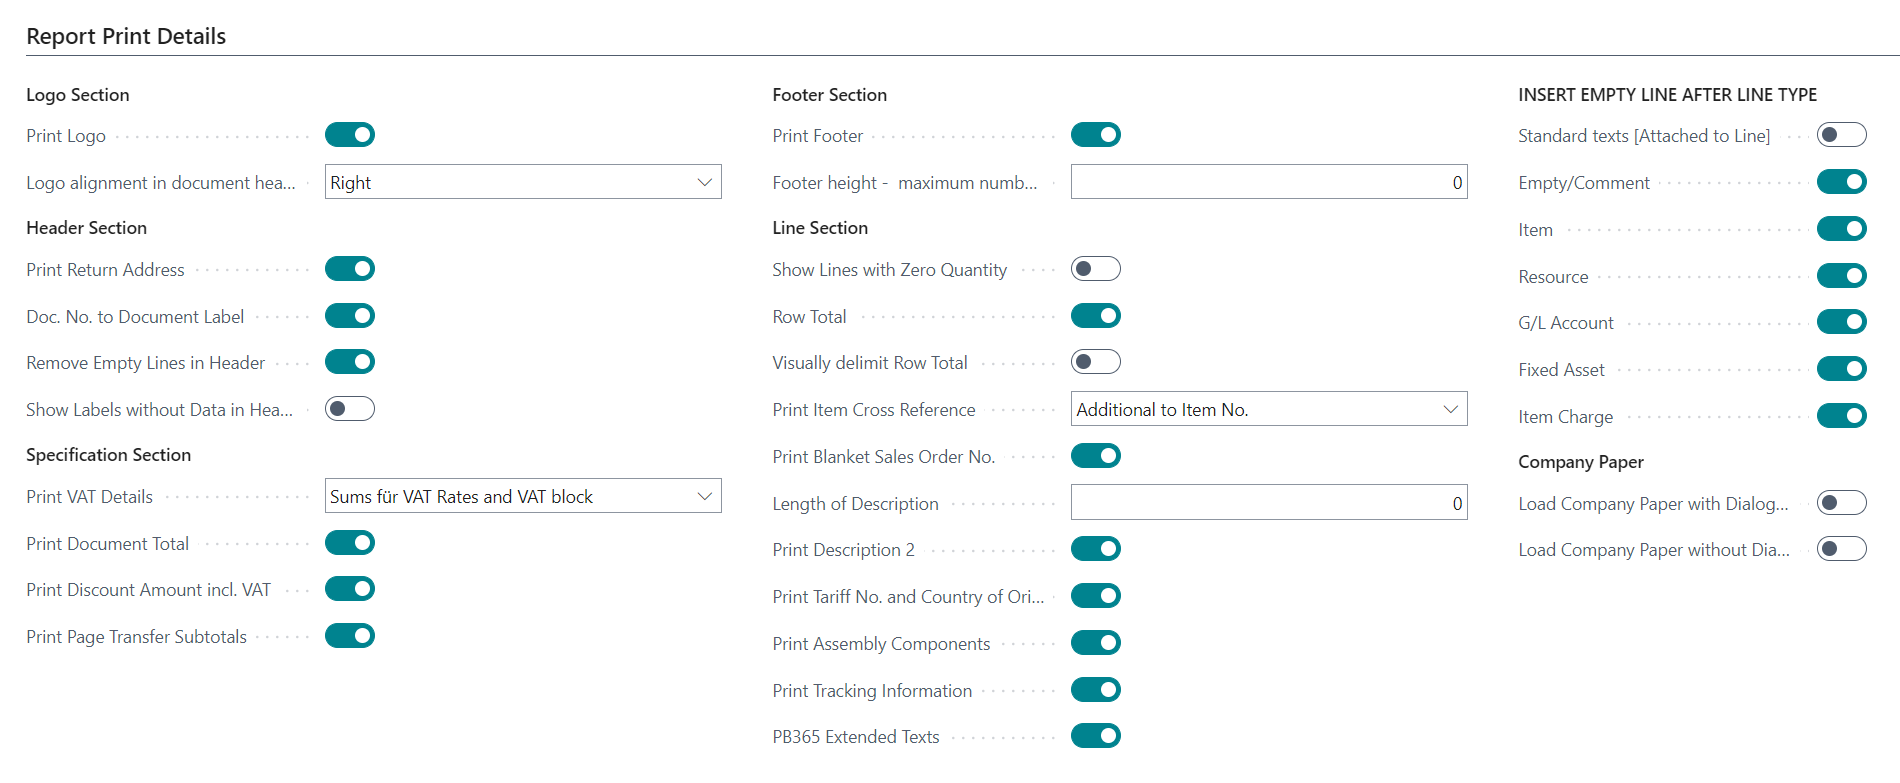
The overview CD Layout Sections and Document Elements provides an overview of the structure of the layout and various document elements.
Logo Section
Print Logo
By deactivating this option, the logo is hidden.
Logo alignment in document header
Option values are: Left, Center, Right.
This setting determines whether the Picture from the Company Information at the top of the document is left-aligned, centered, or right-aligned.
Right is the default value.
Header Section
Print Return Address
By deactivating this option, the return address line is hidden.
Doc. No. to Document Label
The document number is printed after the Document Label in the document header, e.g. "Order Confirmation 4711". This is the standard setting. The Document Label can be set in the Report-Specific Setup for every document separately. The variable %1 in the label represents the document label.
If the option is disabled, the document number is displayed in the document header below the document label.
Remove Empty Lines in Header
Header fields that are not filled are removed so that there is no blank space between the entries in the document header.
Show Labels without Data in Header
This prints the labels in the document header, even if they do not contain a value for display. For example, a label "Salesperson" is printed, even if no salesperson is maintained in the document. Initially, this option is deactivated.
Specification Section
Print VAT Details
| Option | Explanation |
|---|---|
| None | The VAT is printed as one amount directly below the document total. |
| Detailed VAT block | The VAT calculation details are printed as a separate block between the document total and the footer. The details contain e.g. the base for the VAT calculation and the invoice discounts. |
| Sums for VAT Rates | The VAT is displayed directly below the document total, with one line for each VAT rate, e.g. 7% and 19%. |
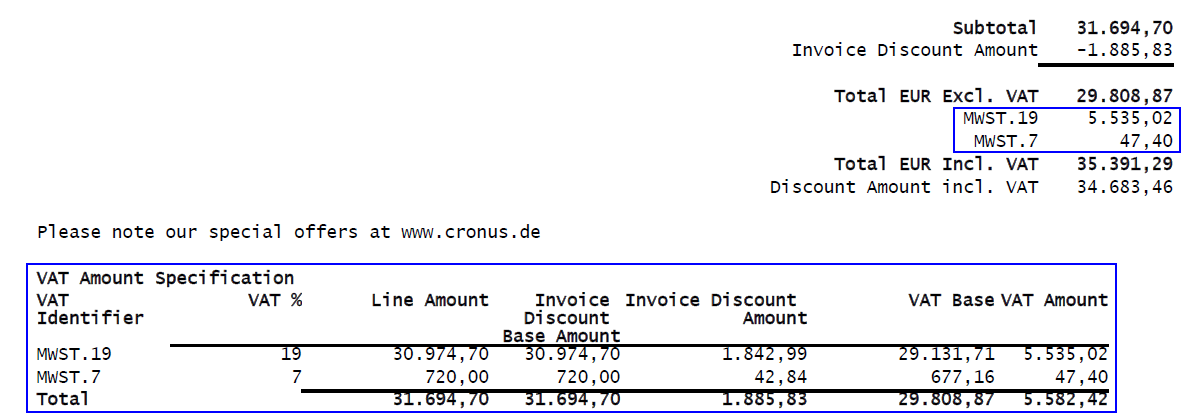
| Sums for VAT Rates and VAT block | The VAT is printed in both formats. |
With the options Sums for VAT Rates and Sums for VAT Rates and VAT block, each rate line is labelled with the VAT Identifier of the rate. In a company that uses Sales Tax instead of VAT, the tax rate is printed instead. For details, see Sales Tax on Corporate Design Documents.
Example for Sums for VAT Rates and VAT block:
Print VAT Total when Zero
If this option is activated, a VAT total line with the label VAT 0% and the amount 0.00 is printed in the document total section, when the calculated VAT amount is 0 — for example, because all document lines have a 0% VAT rate. Initially, this option is deactivated. In a company that uses Sales Tax instead of VAT, the label Tax 0% is printed.
Note
If the document total itself is also 0, the VAT zero line is only printed when both this option and the Print Document Total setting Print with zero Amounts are enabled.
Print Document Total
The Print Document Total option controls whether and how the sum of all line amounts is printed as the document total.
| Option | Explanation |
|---|---|
| No Print | The document total is not printed. |
| Print without zero Amounts | The document total is printed, but only if the amount is not zero. |
| Print with zero Amounts | The document total is always printed, even if the amount is zero. |
Note
Every amount in the document total section is printed with its value, including the value 0.00. An amount is never left blank when its line is printed. This applies to all lines of the section — subtotal, invoice discount, tax amounts, the totals, and the discounted amount. Which lines are printed at all remains controlled by the options of this section, for example Print Document Total and Print VAT Total when Zero.
Print Discount Amount incl. VAT
If this option is activated, the document total minus the cash discount amount is printed below the document total. This corresponds to the total to be paid within the cash discount period. The amount is printed only if there is a cash discount. The line is labelled with the Field Label Discounted Amount incl. VAT, or with Discounted Amount incl. Tax in a company that uses Sales Tax instead of VAT.
Print Page Transfer Subtotals
The printing of subtotals can be activated with this option. Subtotals transfer the line sum from one page to the next.
Footer Section
Print Footer
By deactivating this option, the footer is hidden.
Footer height - maximum number of lines
The maximum number of lines in the footer can be entered here. This controls the height of the footer. If the field remains empty, the maximum number of lines defined in the default layout is used.
Note
This field can only be used meaningfully with the Corporate Design Layouts SYS_FOURCFNOEMAIL and SYS_FOURCOLFOOTER. With the other layouts this setup results in a faulty footer. Hence, it is recommended to set the field to the value 0.
Line Section
Show Lines with Zero Quantity
If the option is activated, item lines with an empty quantity (= zero quantity) are printed in the document. Initially, this option is disabled.
Row Total
By activating this option, a totals line can be printed after the lines. The configuration of the totals line must be made in the Page CD Field Configuration. This feature can be used to print the total weight on a shipment document, for example, as described on the page Calculation and Row Total.
Visually delimit row total
By activating this option, the row total is delimited optically from the other lines through a stroke. This improves the readability of the document.
Print Item Cross Reference
| Option | Explanation |
|---|---|
| No Print | No Item Cross Reference Number is printed. |
| Additional to Item No. | The Item Cross Reference Number is printed in addition to the Item Number. |
| Replace Item No. | The Item Cross Reference Number is printed instead of the Item Number, if available. The Item Description is also replaced. |
| Additional to Item No. with Description | The Item Cross Reference Number and Item Cross Reference Description are printed in addition to the Item Number. |
Note
This is a Line Extension, for this a separate setup in the CD Field Configuration is necessary, see page Set up line extensions.
Print Blanket Sales Order No.
By activating the option, the Blanket Sales Order No. is printed if the document line is linked to a blanket sales order.
Note
This is a Line Extension, for this a separate setup in the CD Field Configuration is necessary, see page Set up line extensions.
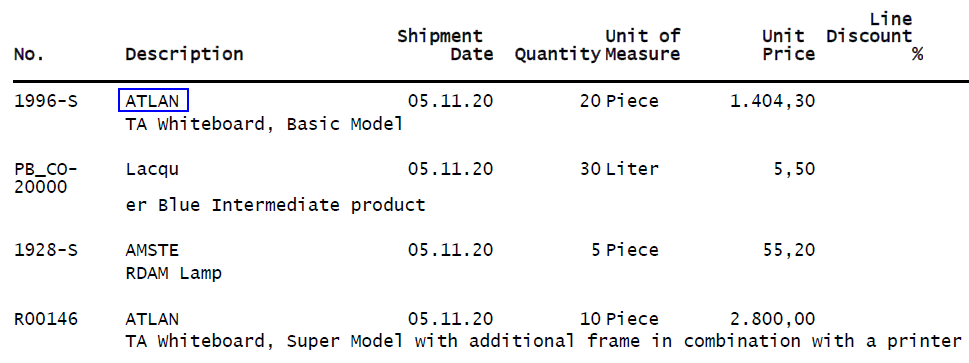
Length of Description
Limits the length of the Description field in the document line. This can be necessary, for example, if you want to use very little space for the description in the document line. A length of 5 characters can be specified here, for example. The text after the 5 characters is then printed below the actual document line in a "second document line".
If description 2 should also be printed, it is printed in the "second document line", after description 1.
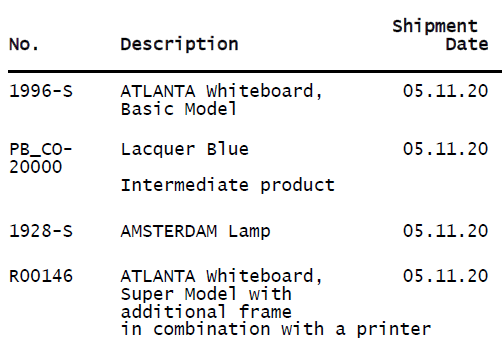
If the setting is 0 characters, a line break occurs if there is no more space for a word. Whole words are generally not separated. This is the initial and recommended setup.
Note
With non-proportional fonts, the width of different characters varies, i.e. a word with 5 characters can have a different width in different fonts.
Examples for settings:
Length of the description = 5
Length of the description = 0
Print Description 2
By activating this option, description 2 of the item is printed, below description 1.
Note
This is a Line Extension, for this a separate setup in the CD Field Configuration is necessary, see page Set up line extensions.
Print Tariff No. and Country of Origin
By activating this option, the Tariff No. and Country of origin from the item card is printed per line.
Note
This is a Line Extension, for this a separate setup in the CD Field Configuration is necessary, see page Set up line extensions.
Print Assembly Components
The assembly components of the item are printed below the document line.
Note
This is a Line Extension, for this a separate setup in the CD Field Configuration is necessary, see page Set up line extensions.
Print Tracking Information
By activating this option, the item tracking data of the line will be printed. The Serial Number, Lot Number, Quantity, Unit of Measure and Expiration Date.
Note
This is a Line Extension, for this a separate setup in the CD Field Configuration is necessary, see page Set up line extensions.
Yaveon 365 Document Texts
By activating this option, the Yaveon 365 Document Texts are printed on the document header, -footer and in the -lines.
Note
For the line texts this is a Line Extension, for this a separate setup in the CD Field Configuration is necessary, see page Set up line extensions.
INSERT EMPTY LINE AFTER LINE TYPE
By activating the respective option, an empty row is inserted below the respective document line. This visually separates the document line from the subsequent lines.
- Standard texts [Attached to Line]
- Empty/Comment
- Item
- Resource
- G/L Account
- Fixed Asset
- Item Charge
- Allocation Account
Company Paper
The Company Paper functionality can be used to replace the logo section and the footer section of a document with pictures. This can be used when documents are normally printed on pre-printed company paper. However, when they are printed as PDFs or send by E-Mail, the pre-printed company paper can be replaced by those two pictures, which can be uploaded in FactBox Company Paper Image.
A detailed description of the functionality and the setup can be found on the Page Company Paper.
Load Company Paper with Dialog - Default Value
The option Load Company Paper with Dialog - Default Value sets a default value for the option Load Company Paper in printing dialogs. The option Load Company Paper decides, if the company paper pictures are added to the printed document. The value can be changed in the printing dialog, so the user can decide if the company paper is added to the document.
Note
This set up is used for all reports. It cannot be overwritten by a setup in the Report-Specific Setup and Custom Specific Setup.
Load Company Paper without Dialog - Default Value
The option Load Company Paper without Dialog - Default Value decides, if the company paper pictures are added to a document, that is created without a printing dialog, e.g. when sent per E-Mail.
Rendering
Disable HTML Conversion
If this option is activated, special characters in fields are no longer replaced by HTML entities when printing. For example, a value such as < 0.5 mg would not be converted to < 0.5 mg. By default, this conversion is active to prevent special characters such as < from being interpreted as HTML tags in the layout. Deactivate this option only if the layout explicitly handles such characters.
Debug tab
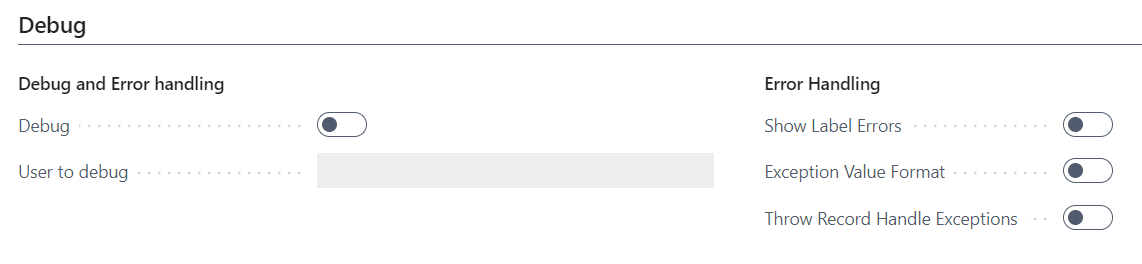
Debug and Error handling
Debug
By activating the Debug field, a kind of debugging can be performed to find errors in the setup. If the user activates the field, then this user is entered in the User to debug field. If this user subsequently prints a Corporate Design controlled document, then the document data used for printing is entered into the Buffer Report Lines and Buffer Report Line Field Extensions tables. This data can be used to find errors in the setup. Only one user can debug at a time. Debugging should only be activated to find an error, as this burdens the system performance and generates unnecessary data.
User to debug
The user who has activated debugging is automatically entered here.
Error Handling
Note
The following three options apply to all users, and are independent of the debug function
Show Label Errors
If this option is activated, any errors that occur in the label generation will be displayed on the document as "undefined", e.g. missing translations in the table CD Labels. If the option is not active, the name of the variable is printed.
Exception Value Format
If this option is activated, document printing is aborted with an error message if a data type cannot be processed in the CD formatting functions. If this option is deactivated, the data record is printed unformatted on the document.
Note
The setup is only relevant if new data types are added.
Throw Record Handle Exceptions
If this option is activated, document printing is terminated with an error message if inconsistencies occur when the options are extended by programming. If this option is deactivated, printing is performed, but printing errors may occur on the documents.
Other Yaveon 365 Apps tab
Depending on the installed Yaveon 365 Apps, additional tabs are part of the setup page, and provide additional setup options, analogous to the Report Print Details.
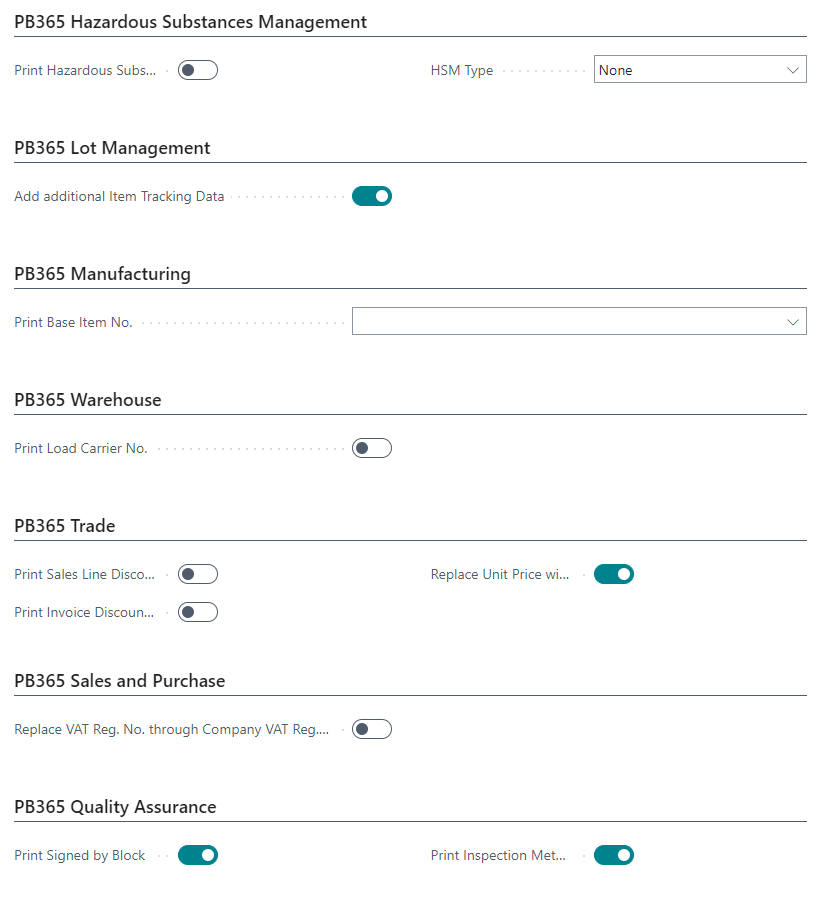
Yaveon 365 Hazardous Substances Management
Print Hazardous Substance Informations
If this option is enabled, HSM data will be printed on line and document level, if available. Especially on sales shipments and order confirmations.
Note
This is a Line Extension, for this a separate setup in the CD Field Configuration is necessary, see page Set up line extensions.
HSM Type
The HSM data is printed depending on the HSM type configured here.
Yaveon 365 Lot Management
Add additional Item Tracking Data
This option adds the data from the Yaveon 365 Lot Management App to the standard BC option Print Tracking Information. If the Yaveon 365 Lot Management App is installed, this option must be enabled for the data to be printed. More information about the setup can be found in the page Item tracking setup on documents.
Yaveon 365 Manufacturing
Print Base Item No.
This option allows printing the Base Item Number as a line extension.
| Option | Explanation |
|---|---|
| Empty | The Base Item No. is not printed. |
| Additional to Item No. | The Base Item No. is printed additionally to the Item No. . |
| Replace Item No. | The Base Item No. replaces the Item No. . |
Note
This is a Line Extension, for this a separate setup in the CD Field Configuration is necessary, see page Set up line extensions.
Yaveon 365 Warehouse Management
Print Load Carrier No.
This option enables the printing of load carrier numbers as line extensions.
Note
This is a Line Extension, for this a separate setup in the CD Field Configuration is necessary, see page Set up line extensions.
Yaveon 365 Trade
Print Sales Line Discount Details
This option allows printing details of multi-level line discounts as line extensions.
Note
This is a Line Extension, for this a separate setup in the CD Field Configuration is necessary, see page Set up line extensions.
Replace Unit Price with Unit Price in Pricing Unit
This option replaces the content of the Unit Price field in the document line with the Unit Price in Pricing Unit field, and adds the note The Price refers to XX units as a line extension. The function of the pricing unit is explained in the help page Sales Price Unit of Measure.
Note
This is a Line Extension, for this a separate setup in the CD Field Configuration is necessary, see page Set up line extensions.
Replace Direct Unit Cost with Direct Unit Cost in Pricing Unit
This option replaces the content of the Direct Unit Cost field in the document line with the Direct Unit Cost in Pricing Unit field as a line extension.
Note
This is a Line Extension, for this a separate setup in the CD Field Configuration is necessary, see page Set up line extensions.
Print Invoice Discount Details
This option allows printing details of multi-level invoice discounts on the document in the specification area.
Yaveon 365 Sales and Purchase
Replace VAT Reg. No. through Company VAT Reg. No.
This option allows replacing the client VAT Registration No. with the Company VAT Registration No. per country, that is seen in the document. For more information go to page Country-specific VAT ID, Account Assignment and tax-rate determination.
Print Alternative Quote Line Text
If this option is activated, an alternative text for the quote line is printed on the document.
Yaveon 365 Quality Assurance
Print Signed By Block
This option allows printing a signed by block on the Certificate of Analysis. For more information go to CD Setup Certificate of Analysis.
Print Inspection Method
This option allows printing the Inspection Method on the Certificate of Analysis as Line Extension. For more information go to CD Setup Certificate of Analysis.
Note
This is a Line Extension, for this a separate setup in the CD Field Configuration is necessary, see page Set up line extensions.
FactBoxes
The FactBoxes can be opened by clicking on the i symbol on the upper right hand corner of the setup page.
When clicking on the name of the FactBox, three options are shown.
Import
With this action, an image can be imported. If an image is already uploaded, this option can be used to replace the current image.
Export
With this action, an existing image can be exported.
Delete
With this call, an existing image can be deleted.
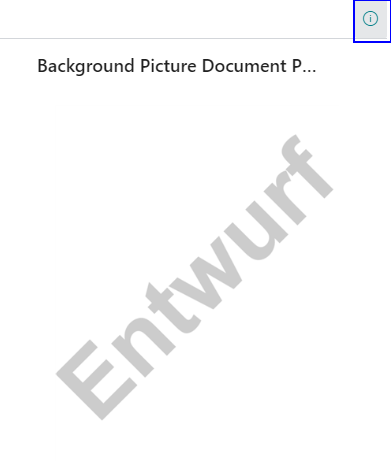
FactBox Background Picture Document Preview
An image can be uploaded through this FactBox. It is displayed in the background when the document is generated as a Preview. Therefore it can be shown, that the document is a draft.
FactBox Company Paper Image
Two images can be uploaded through this FactBox. They replace the logo section and the footer section of a document. When starting the import of the images, a dialog appears in which the section of the upload can be selected.
A detailed description of the Company Paper functionality and the setup can be found on the Page Company Paper.
Functions Initialize and CD Setup Export/Import
The functions can be called in the menu band of the setup page.
Function Initialize
By executing the Init function, a standard setup is created for all Corporate Design Documents. If a setup already exists, it will be overwritten and reset to the standard.
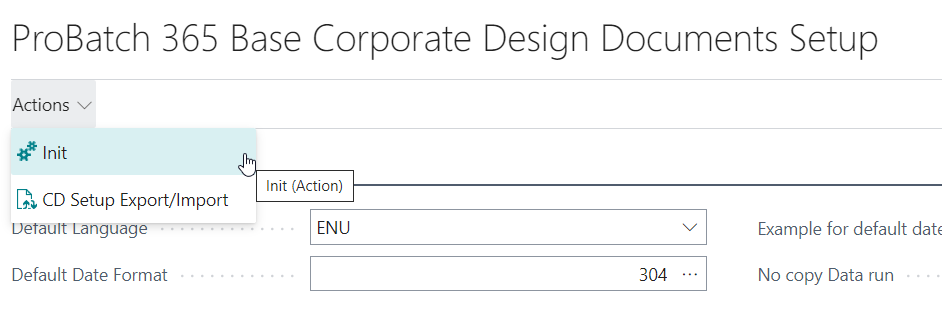
A description of the initialization process can be found on the page (Re-)Initialize Corporate Design Setup.
The function indicates the successful initialization with a message.
Function CD Setup Export/Import
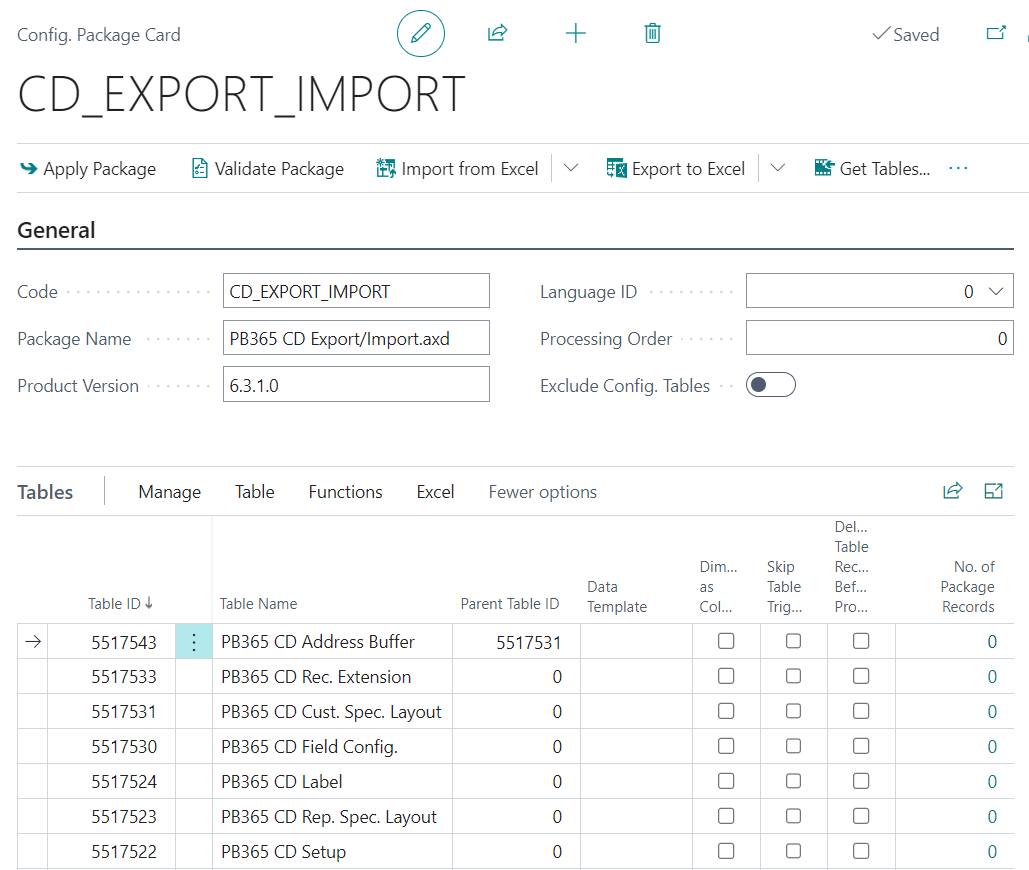
The CD Setup Export/Import function provides an easy way to export and then import the Corporate Design setup tables. This can be used, for example, to transfer the setup from one company to another company in the system.
After starting the function, the option Export must be selected in the menu. The available buttons can be used to select which tables are exported. The filter area Corporate Design Custom Specific offers the possibility to filter the customer specific setups which should be exported.
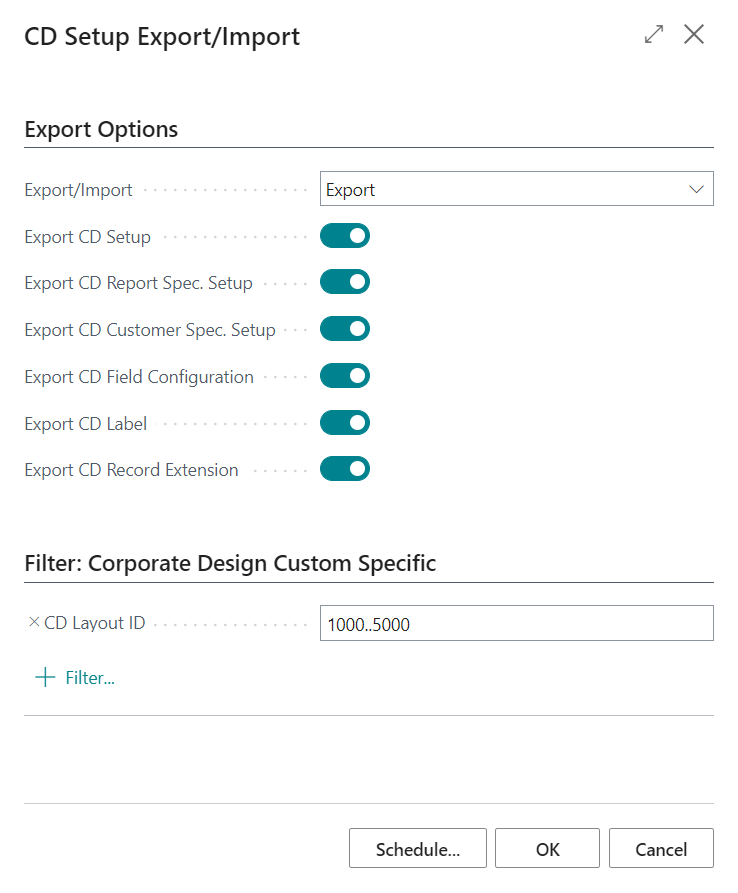
The result of the export is a configuration package named PB365 CD Export_Import.axd. This is a BC Standard Rapid Start configuration package containing the Corporate Design setup tables.
To execute the import, the function must be started again and the option Import must be selected. In contrast to the export, it is not possible to set options during the import.
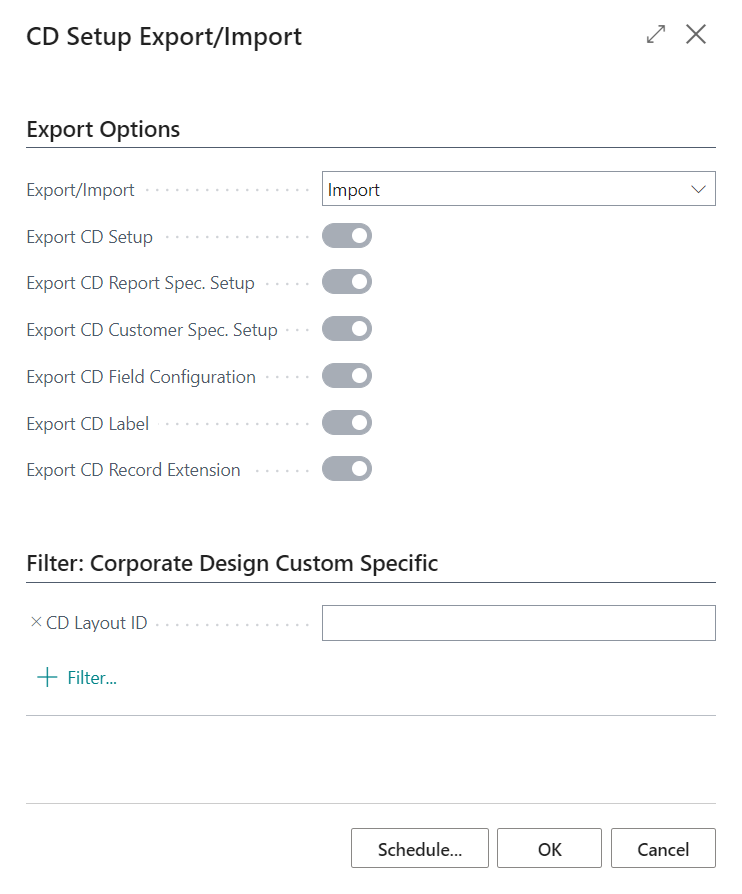
To start the import, the previously exported configuration package must be selected, using the Choose function.
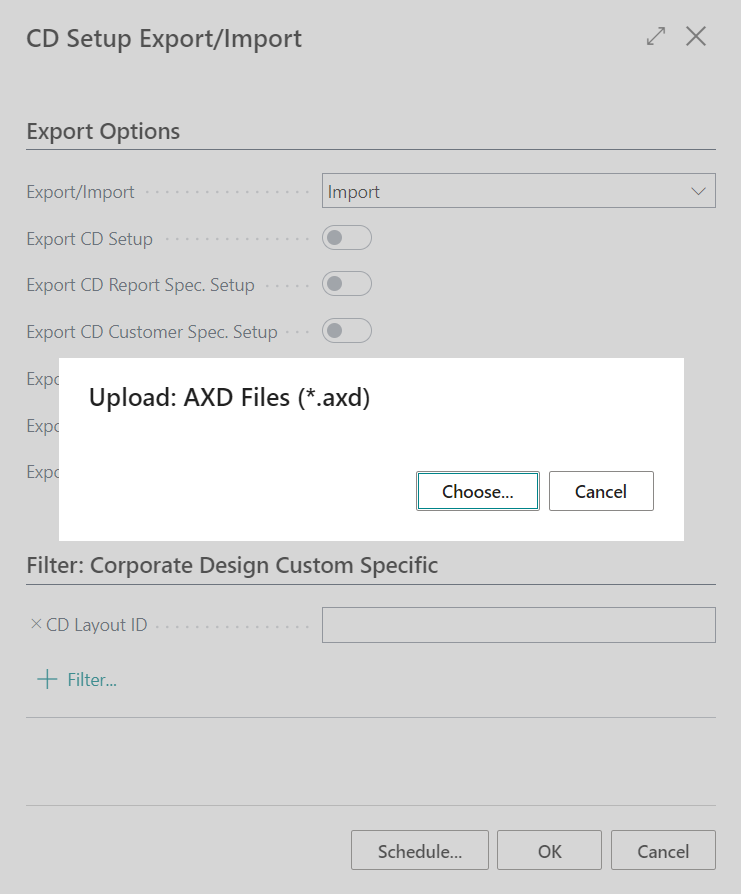
After completing the import a corresponding message is displayed.
The import of the configuration package is also possible without the import function by using the Configuration Packages that can be found via the menu.
Note
Please be aware, that the file exported through the CD Setup Export/Import function is a file of type .axd. Only this file type can be imported through the CD Setup Export/Import function.
To Export and Import the created Configuration Package CD_EXPORT_IMPORT.rapidstart without the CD Setup Export/Import function, use the Export Package and Import Package functions on the Configuration Package card page.